|

Welcome to the RealBiz360 step-by-step Getting Started Tutorial! Here you will find all the information you need to start creating your website and virtual tours.
- Selecting the equipment you will need
- Digital camera
- Tripod
- Assembling a tripod
- Digital memory card reader
- RealBiz WebCreator
- RealBiz TourBuilder
- Personal information
- Choose a website style
- Create and customize your web pages
- Create and manage your tours
- Publish your tours
- View your website and tours
- Website statistics
- Support
- Log-out
- Installing RealBiz TourBuilder
- Adding pictures
- Creating panoramas
- Previewing your pictures and panoramas
- Uploading your pictures to your RealBiz360 online account
- General tips
- Indoor shots
- Outdoor shots
Introduction
The RealBiz360 Solution
The RealBiz360 Solution is designed for real estate agents by real estate agents. We have taken special care to create an innovative online marketing system that is easy-to-use, fast and affordable!
The RealBiz360 Solution will enable you to create and manage your professional website and virtual tours like no other solution on the market.
The RealBiz360 Solution includes two options designed to best suit your needs.
RealBiz WebCreator and RealBiz TourBuilder: create, manage and build your website
RealBiz TourBuilder: stitches your pictures, builds templates, publishes your tours.
The following tutorial provides a step-by-step instruction on how to create your website and shoot and create your virtual tours.
Back to Contents
Getting Started
Before you start using the RealBiz360 Solution, it's a good idea to review the type of equipment you will need to assist you in creating the best possible tours for your listed properties.
Important: We highly recommend that you save your pictures onto your computer before using the TourBuilder application. For organizational purposes, it may be useful to create a folder with the property address where you will store your images. This will ensure that you will always have a backup of your pictures should you need to recreate a tour in the future.
Selecting the equipment you need to create your property tours
- digital camera
- tripod (recommended)
- digital memory card reader (recommended)
- a computer with a Windows OS
Digital Camera
A digital camera is essential for you to begin taking your pictures to complete your tour. If you are new to digital cameras and their resolutions, any digital camera will work however, for shooting and displaying virtual tours, we suggest a digital camera with resolutions anywhere in the range of 2 to 3 megapixels.
Batteries
Many digital cameras eat batteries because they have to power an image sensor, an LCD panel and a microprocessor all at the same time, and sometimes there's a flash as well! Many camera use standard AA-sized batteries for power, but it's very important to note that they really don't do well on standard alkaline cells. Digital cameras draw large amounts of current, far more than alkaline batteries are designed to provide. The result can be very short battery life, sometimes measured in minutes.
To avoid the frustration of massive battery drain, it's essential that you buy a couple of sets of rechargeable NiMH (Nickel-Metal Hydride) batteries and a good charger. The total cost will probably be about $30, but you'll save that amount many times over by not having to buy fresh alkaline cells every few dozen shots.
Make sure the camera has enough memory.
There is nothing more frustrating that "running out of film" while you are shooting your tour. The "film" for a digital camera is Flash memory, floppy disks, small hard disks, etc. Most cameras let you download pictures from the camera so that you can take more pictures. There may be times when you are near your computer to download your files. In this case it will be helpful have enough extra memory when you buy your camera so you won't run out when you need it. CompactFlash cards now come with up to 1 GB of space, so it's definitely possible to get all the memory you'll need for shooting your tours.
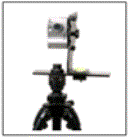
Tripod
Tripods are designed to quickly capture perfectly aligned, level and evenly overlapping full ceiling to floor, portrait style images for the creation of 360º panoramic tours. While it isn't necessary to own a tripod, we definitely recommend it. This helps RealBiz TourBuilder calculate a more precise stitch, resulting in the most seamless finished panorama.
Using a tripod helps you:
- Hold the camera steady and parallel to the ground
- Avoid vertical tilting during rotation
- Achieve more precise image alignment in RealBiz TourBuilder
- Ensure a sufficient amount of overlap between adjacent images
- Allows the camera to rotate around the lens nodal point (the optical center of the lens)
In indoor scenes (inside rooms), objects will be closer to the camera and rotating the camera round the lens nodal point becomes more critical. In such cases you may want to consider the use of a special panoramic tripod head.
Assembling the tripod
- Mount the digital camera on the tripod.
- The camera should be oriented to take portrait photos (tall and narrow). Portrait photos will capture part of the ceiling, the wall, and part of the floor of a room. Landscape photos will only capture the wall itself.
- Set up the tripod in the center of the room.
TIPS
-
The farther off-center you are, the more distortion may appear in the photo.
-
Do not place the tripod directly in front of a mirror, as you will capture your reflection in the photo.
-
Place the tripod securely on the ground. All leg locking clamps must be tight.
-
Use the level indicators on the tripod or panorama head to make sure the tripod is not leaning in any direction.
|
 |
Using a Panoramic Tripod Head
The purpose of a panoramic head is to allow you to accurately position your camera so that when you turn it you are turning it about one of the nodal points of your lens. By rotating the camera around a nodal point of the lens, you get consistent images each time to make up the final panorama tour.
Digital Memory Card Reader
A memory card reader is an efficient and easy way to transfer your files. The memory card reader can always be attached to your computer. No more fiddling with extra cables. Whenever you are ready to transfer your files, remove the card from your digital camera, insert it into the reader and drag and drop files from the card to the computer's hard drive. It's that easy. A card reader is not necessary but we recommend using one.
Back to Contents
Taking your Photos
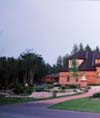
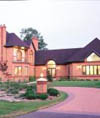
When taking pictures of your listed property, be sure to shoot everything that you would normally show a potential buyer if you were to take them on an actual tour in person. When deciding how many pictures to take, it is best to take more than what you need; you can always delete unused pictures later.
To create panoramas, you will take individual overlapping pictures. Make sure that your camera is zoomed out all the way to capture as much of the scenery as possible. If you are in a smaller room then maybe you don't want to do this. Use your discretion. One thing you must remember is that there must be at least a 20% overlap between each picture. When creating a 360-degree panorama, make sure your last picture overlaps with the first one.
Notice that each of the pictures above has at least a 20% overlap.
When it is time for you to create your tour, you will use RealBiz TourBuilder, the software application that lets you create 360-degree virtual tours for your website. RealBiz TourBuilder will stitch all of your photos together to create one seamless 360-degree image.
Back to Contents
Transferring your Photos to your Computer
The best way to manage your photos is to copy them to your computer. You can organize your photos by property listing, by room, really anyway you want to make it easier for you to find them later. You can transfer your photos by either connecting your digital camera directly to your computer or by using a memory card reader.
Note: Remember, if you want to use your images for other marketing options, like a feature sheet or for real estate advertising portals that requite image and file uploads, such as PICTURE PATH / REALTOR, it is suggested that you store your images on your computer for the duration of the property listing.
It is easy to do this…
Using Windows, click on the Start button, then Programs, then Windows Explorer. Another alternative is to click My Computer right from your Windows desktop. This is the file manager for your computer. Double-click the C drive. From the File menu, select New > Folder. You will create a new folder to store you original images. Name this new folder the property address for easy organization.
Another way of creating a new folder is right from your Windows desktop. Right-click anywhere on your desktop and a menu will appear. Choose New > Folder. Name the new folder the property address.
You are now ready to move or save your images right into the new folder you created.
Moving your images
Your digital camera comes equipped with a cable that lets you connect your camera to your computer to transfer pictures files from your camera's memory to the computer's hard drive or other storage device. Transferring files this way is not as easy as connecting a memory card reader to your computer. In order to transfer your files, you must have the USB (Universal Serial Bus) cable available to be connected to your camera at all times. Also, the camera must be powered on during the transfer which uses up more battery power.
A memory card reader is a more efficient and easy way to transfer your files. The memory card reader can always be attached to your computer. No more fiddling with extra cables. Whenever you are ready to transfer your files, remove the card from your digital camera, insert it into the reader and drag and drop files from the card to the computer's hard drive. It's that easy.
Back to Contents
Using the RealBiz360 Solution
The complete RealBiz360 Solution includes both the RealBiz WebCreator and RealBiz TourBuilder module. For those who do not require a website, WebCreator offers the RealBiz TourBuilder module as a stand alone program.
RealBiz WebCreator
RealBiz WebCreator is the application that is hosted by RealBiz360. It gives you the ability to create your website as well as have tours posted there.
RealBiz TourBuilder
RealBiz TourBuilder is the application that resides on your computer. Using RealBiz TourBuilder you create your tours using panoramas and images. Yours tours are then uploaded to RealBiz360 where you can create and manage your tours before they are seen by site visitors.
Back to Contents
Using RealBiz WebCreator
RealBiz WebCreator is the application that resides on the RealBiz360 website. There is where you will create your personal website and add your tours.
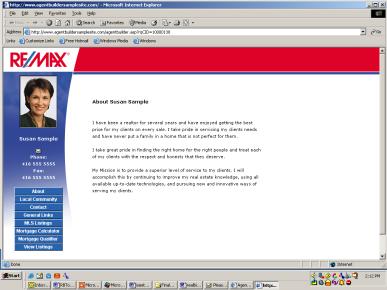
Personal Information
In the Personal Information section, you can add or update your personal information such as name, address, web and email address. You also have the option to upload a picture of yourself. The information that is entered on this page will be used as your Home page.
Choose a Website Style
This is where you will choose a company template such as Remax, Royal LePage, etc. for your website. If you are not affiliated with a real estate company, you can choose a custom WebCreator template. As well as this, if you have created your own company logo, you can upload it using this screen.
Create and Customize your Web Pages
In this section of RealBiz Website Creator, you customize the pages that you want to appear on your website. You have the option to add or remove existing pages that are provided by RealBiz360 such as a mortgage calculator. You can also create custom pages. You may want to add additional information about the location of the property you are selling such as community information or website links. At any time, you can visit this section and add or remove additional pages.
Property Information and Tours
This is the section where you will manage your properties and tours. Listed properties and tours can be added, deleted or modified. When you select add a new property, you will enter information related to your listed property. Once this is done, you can add to a tour to accompany your listed property on your website. When you select add a tour, RealBiz TourBuilder, the application that is located on your computer will launch. See Using RealBiz TourBuilder for more information.
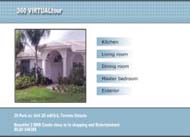
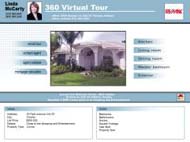
View your Website and Tours
You can preview what your website will look like with your tours included with the property listing.
Website Statistics
This page will give you information such as how many times website visitors have viewed the About page, viewed the Details page and viewed your listed properties page.
Log-out
Log out of the RealBiz360 WebCreator Program.
Back to Contents
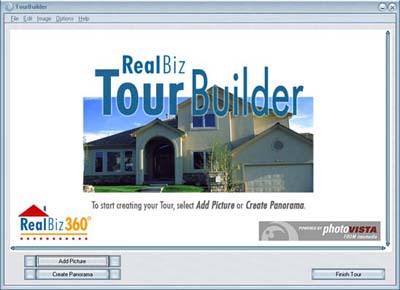
Using RealBiz TourBuilder
RealBiz TourBuilder is the application that resides on your computer and will help you create your tours. It is launched directly from the RealBiz360 website. You will, however, have to install it from the CD that you have received when you registered with the RealBiz360 Solution.
Installing RealBiz TourBuilder
To install RealBiz TourBuilder, insert the CD you received into the CD-ROM. Follow the on-screen instructions. One thing you must remember is when entering your username and password during the installation, it must match the username and password you used to register for the RealBiz360 program. Entering this information correctly allows you to upload your tours and images directly to RealBiz Website Creator. If you entered the wrong username or password, you must uninstall the application and reinstall it.
Adding pictures
Your tours can be made up of 360-degree panoramas and pictures. Pictures are images that you have taken of your property that do not have to be stitched to create a panorama. From the RealBiz TourBuilder main screen, select Add Picture. The Add Picture dialog is displayed where you can select the picture you would like to add to your tour. RealBiz TourBuilder supports the JPEG image file format which is the default file format used by your digital camera.
Creating Panoramas
Panoramas are made up of several photos that are stitched together with RealBiz TourBuilder to create a 360-degree image. From the RealBiz TourBuilder main screen, select Create Panorama. The Create Panorama dialog is displayed. From this screen you will select all of the pictures you have taken with your digital camera to make up the panorama. RealBiz TourBuilder supports the JPEG image file format which is the default file format used by your digital camera.
Previewing your pictures
Whether you creating a panorama or adding a picture, once you have selected your images, the Preview screen will be displayed.
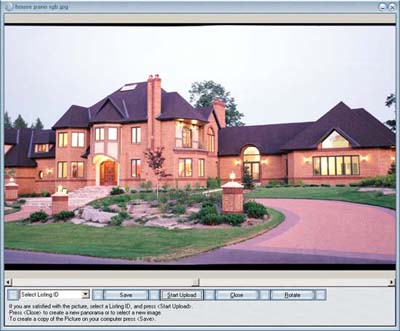
From this screen, you have a few choices. You can choose between saving your picture, uploading it to RealBiz Website Creator, rotating your picture or, if the picture doesn't look like it should in the preview window, you can start again by selecting Close.
Uploading your Pictures to RealBiz WebCreator
If you are happy with the way your panorama or picture is presented in the preview window, you are then ready to upload it to your RealBiz account. In order to complete the upload, your computer must be connected to the Internet. Choose the property listing from the Listing ID dropdown menu. Once you have selected the property listing, select the Start Upload button. You will be shown the progress of the upload of your picture. Once it is complete, click OK.
Your panorama or picture is now part of your tour on your RealBiz WebCreator account. Select Finish Tour if you have uploaded all of your panoramas and images. Once you login to your RealBiz360 account, you will be able to create, edit and publish your completed tours.
Back to Contents
Managing your Tours
Up to this point you will have already started to create your website using RealBiz WebCreator. Your contact information has been added, you have selected a template to base your website on and you have added your listed properties. Now it's time to decide what pictures you are going to use to represent your listed property.
On your RealBiz WebCreator account, select Tours. From here you will then click Add, Edit, Delete or Publish a Tour. Select the property listing where your panoramas and images were added to. For each of the panoramas and images that were added, you can then choose to enter a description, include them in the tour or delete them. Once you have edited your tour, click Update. You can preview what your Property Tours will look like by clicking View your Website and Tours.
Publish your Tours
You can publish your tours to an external website or to an MLS system. Select the service you would like to use. RealBiz360 will give you instructions as to how to proceed.
RealBiz360 offers customized viewer templates for publishing, free of charge!
An IDX compliant viewers and full featured viewers.
Back to Contents
Tips and Tricks
General Tips
- Make sure you take your photos in a clockwise rotation so that RealBiz TourBuilder will stitch the photos properly.
- If you want to create a full 360-degree image, don't forget to make sure the last picture overlaps with the first one.
- It is always important to study the scene you will be photographing. Take time to stand where the panorama will be taken from and slowly turn around to see that all aspects of the scene will be appropriate.
- You can take panoramas without a tripod but you must try and keep the camera as steady and level as possible.
- To gain a greater vertical field of view, it is common to take the panorama photos in portrait mode. This means you turn the camera on the side and each photo will be higher than it is wide.
- Purchase extra memory cards for your camera. When you run out of room on one, you can quickly swap cards and take more pictures.
- Take advantage of your camera's review and delete pictures you don't want to keep before you transfer them to your computer.
- Try to avoid taking photos of rooms with aquariums because the glass will reflect the flash. If you have to include an aquarium in a panorama, adjust the starting position of the panorama to make sure that the entire aquarium is visible in the middle of the shot, rather than splitting it between two shots.
- Avoid taking photos with people in view.
- Do not position the camera setup directly in line with any wall mirror or floor-standing mirror, because a reflection of you and the camera setup will appear in the photo.
- Keep doors open and lights on in rooms that are in the background of a panorama.
- If shooting a living room with a television, make sure the television is turned off and that the tripod is not set up directly in front of it because a reflection of the camera setup will appear in the photo.
- Ensure the camera is on level ground. Make use of the levels built into the panorama head.
- Avoid photographing scenes with fast moving objects in them. If a car drives by, take the shot again. This is also true for property that has a working fountain. The gushing water may cause a blurring effect in the photo making it difficult for the software to stitch.
- Consistent weather conditions are best. If a scene for half of the photos shows a bright blue sky and the other half with the sun hiding behind clouds, RealBiz TourBuilder may have difficulty stitching the panorama.
- If you want a clear sky in your panorama, shoot at midday, when the sun is directly overhead and doesn't cast strong shadows on the landscape.
|